Especially at the beginning of a new project, you don’t always know which microcontroller you will finally use. Is the memory sufficient, is the computing power adequate, …? These are questions that often arise. Of course, you don’t start blindly into a project, but you probably already know quite well which hardware will be used. If the requirements change or you need more or fewer features, then switching is usually annoying and involves a lot of work because the software for the microcontroller has to be completely adapted.
In this post, we will talk about how to set up a project in PlatformIO so that development can be done with multiple microcontrollers at the same time. It is even possible to start with one piece of hardware and later add any number of others without removing the “legacy” code.
platformIO.ini #
The central file in which the entire hardware setup and its associated configuration are defined is platformio.ini. PlatformIO offers the possibility to define multiple “envs” (environments) or commonalities.
For example, if you want to create a specific configuration for Arduino Uno, it can look like this:
[platformio]
default_envs = uno

[env:uno]
platform = atmelavr
board = uno
framework = arduino
upload_port = COM5
monitor_speed = 9600
This code is already prepared so that you can create another “env”. Afterwards, you simply have to change the “default_envs” variable in the platformIO section, and the entire project will be compiled for the newly defined hardware.
For example, if we now add a Raspberry Pi Pico and want to compile for both microcontrollers, it looks like this:
[platformio]
default_envs = uno, rpi_pico

[env:uno]
platform = atmelavr
board = uno
framework = arduino
upload_port = COM5
monitor_speed = 9600

[env:rpi_pico]
platform = raspberrypi
board = pico
framework = arduino
board_build.mcu = rp2040
board_build.f_cpu = 133000000L
upload_port = COM4
monitor_speed = 9600
You can now add and expand microcontrollers and setups or configurations as you like.
Defining Different Libraries, Constants, and Header Files #
If you work with different hardware but only want to use one code base, you will quickly realize that you will run into problems. A simple example would be that different microcontrollers (even if they have the same number of pins) have completely different pin assignments. You can solve this, for example, by using hardware abstraction, or you can use the platformio.ini configuration file to define which header files should be loaded specifically for the microcontroller.
Let’s stick with the example of different IOs: the assumption is that we want to blink the built-in LED. I am aware that this constant already exists (LED_BUILTIN), but the point here is to show with simple examples that it works. In the case of the Arduino Uno, this would be pin 13, and for the Raspberry Pi Pico, it would be pin 25. First, two header files need to be created in which we define these constants. For demonstration and testing purposes, a constant text will also be defined, which will later be used for data transmission via UART.
Important: the files must have the same name but are located in different folders:

io_config.h is created in both the rpipico and uno folders. The content is similar but differs in IO_LED and TEXT2:
io_config.h: Arduino Uno
#ifndef IO_CONFIG_H_
#define IO_CONFIG_H_

#define IO_LED 13
#define TEXT2 "Arduino Uno"

#endif
io_config.h: Raspberry Pi Pico
#ifndef IO_CONFIG_H_
#define IO_CONFIG_H_

#define IO_LED 25
#define TEXT2 "Raspberry Pi Pico"

#endif
The platform.ini file must still be adapted, and the io_config.h header file will be loaded setup-specifically.
[platformio]
default_envs =  uno, rpi_pico
build_flags =
    -I/lib/common

[env:uno]
platform = atmelavr
board = uno
framework = arduino
upload_port = COM5
monitor_speed = 9600
build_flags =
    -include lib/uno/io_config.h

[env:rpi_pico]
platform = raspberrypi
board = pico
framework = arduino
board_build.mcu = rp2040
board_build.f_cpu = 133000000L
upload_port = COM4
monitor_speed = 9600
build_flags =
    -include lib/rpipico/io_config.h
In the individual envs, the specific io_config.h header files are now defined as “build_flags” and are thus loaded specifically. This is a very powerful mechanism that allows independent loading of configurations.
The attentive reader will also notice that “build_flags = -I/lib/common” has been added to the platformIO section. This instruction says that the common folder should always be loaded/imported, regardless of which environment is selected. In the common folder, there is only one header file: “const.h”, whose content defines only one more text constant:
#ifndef CONST_H_
#define CONST_H_

#define TEXT1 "used hardware is: "

#endif
Testing the Software #
To show that all this works, I have created a small program:
main.cpp:
#include <Arduino.h>
#include <const.h>
#include <io_config.h>

void setup() {
  pinMode(IO_LED,OUTPUT);
  digitalWrite(IO_LED,LOW);
  Serial.begin(9600);
}

void loop() {
  while(1){
    digitalWrite(IO_LED,!digitalRead(IO_LED));
    Serial.print(TEXT1);
    Serial.println(TEXT2);
    delay(1000);
  }
}
All necessary headers are loaded:
- Arduino.h: Arduino serves as the basic programming framework
- const.h: The common text constant for UART
- io_config.h: The microcontroller-specific header file
In the setup(), the IO pin of the LED is configured and set to low, and finally, the serial communication (UART) is configured. In the program loop, the LED is toggled every second, and the type of microcontroller is written via the serial interface.
As a reminder: part of this message (TEXT1) is defined in a common header file, and TEXT2 is in the hardware-specific io_config.h.
If you now connect both microcontrollers to the PC (check that the COM ports in platformio.ini are correct), the software can be compiled and programmed with one click.

If you connect to the serial monitor of the two microcontrollers, you will receive the following response:
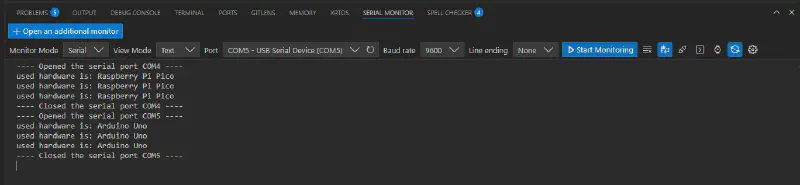
COM4 signals that it is the Raspberry Pi Pico, and COM5 reports as Arduino Uno.
Unfortunately, it cannot be captured in a picture, but I can assure you that the LEDs also blink correctly. This proves that it works not only theoretically but also practically.
Perhaps consider setting up your microcontroller project from the beginning in such a way that it is easier for you to switch to other hardware later. It has often happened to me that I have used non-optimal hardware and could not switch without a huge software conversion. Be smarter than me and apply the method described here.
The project is available here for download as a zip file.
Have fun and success programming your microcontrollers.