Introduction #
PlatformIO is a plugin for Visual Studio Code (VSCode), offering a cross-platform development environment for a wide range of microcontrollers (supporting over 1500 different microcontroller boards). With PlatformIO, various frameworks and real-time operating systems can be used. A central configuration file helps define and customize the hardware and its software environment. If you want to use a different microcontroller board, you only need to change the configuration; the appropriate compiler is loaded in the background, and the program can be flashed onto the microcontroller.
To use PlatformIO, you only need to have Visual Studio Code installed. Then, PlatformIO can be installed via the Extensions tab. Some minor knowledge with the programming language C/C++ is definitely a help but not necessarily required.
USed Software Versions #
Visual Studio Code 1.96.4 PlatformIO Extension 3.3.4 PlatformIO Core 6.1.16 PlatformIO Home 3.4.4
Creating the First Project #
To create a project, simply click on the PlatformIO icon in the Extension tab and select “+ New Project.” If the PlatformIO Home screen is not visible, simply click “PIO Home” - “Open” under “Quick Access.”
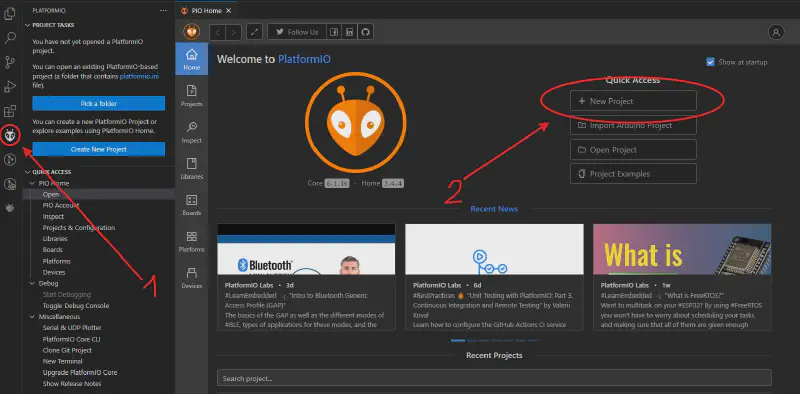
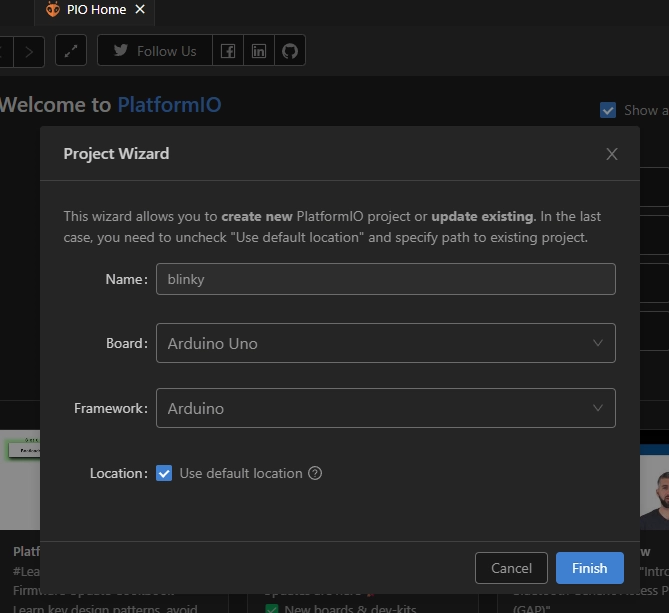
In the Project Wizard, you only need to select a project name, microcontroller board, and framework. We’ll name it “blinky” and select the Arduino Uno Board. We’ll use Arduino as the framework. Don’t worry, the microcontroller or framework can be changed at any time in the platformio.ini file later. Multiple environments can even be configured in parallel, but more on that in the future.
The first project is created, and you get the following pre-made structure:
Folder: .pio temporary folder for PlatformIO, the Hex Files are also stored here. Important: when using git - add the “.pio” folder to gitignore.
Folder .vscode folder for information of the setup in VSCode, extensions, paths, … Can be ignored for the beginning.
Folder: include folder for declarations, macros, etc., especially if you want to share them across projects.
Folder: lib wn or project-specific libraries (source & header files). The suggested layout can be found in the README.
Folder src Project source code that is implemented in the main.cpp file.
Folder test Folder for unit testing or PlatformIO Testrunner.
platformio.ini the configuration file for PlatformIO, in which you configure the entire setup: hardware (microcontroller, clock speed, COM port,….) and software (framework, external libraries and their versioning, ….)
platformio.ini - Overview #
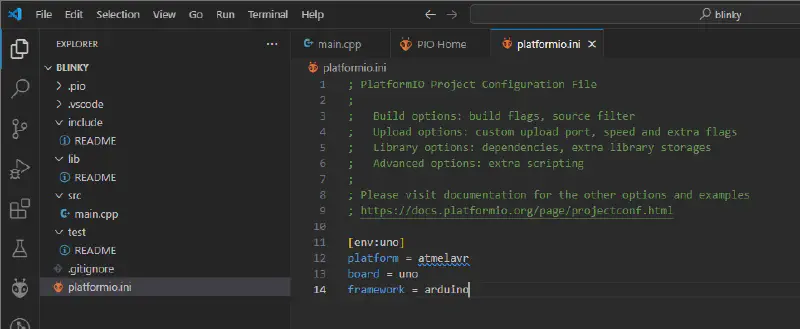
As already mentioned, the entire development system, both hardware and software, is configured in the platformio.ini file. The parameters selected for project creation are stored in the generated configuration file:
1platform = atmelavr
2board = uno
3framework = arduino
The current environment is defined in the square brackets: env:“name” is the standard. If only one is defined, its definition is valid. The remaining parameters are self-explanatory. The official documentation will help with any questions.
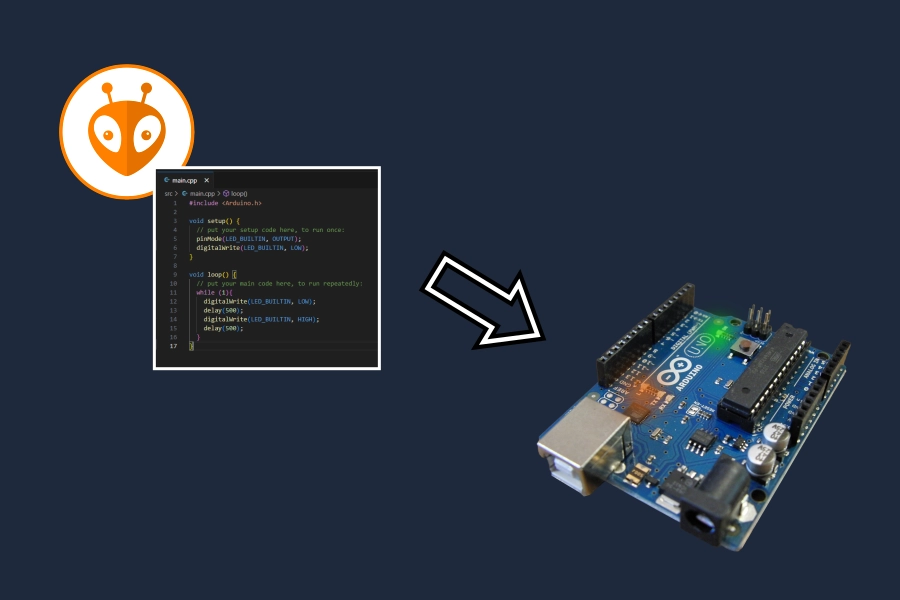
Code: blinky #
The existing code in main.cpp (src folder) is already executable and compilable, but does nothing which is directly visible for the user. This will now be changed. The first programming example is often “Hello World,” but since the microcontroller has no console to output it directly, the equivalent program at the microcontroller level is “blinky.”
What does “blinky” do?
- Input/output pins are configured (output, since we want to blink an LED)
- Infinite loop in which you turn the output on and off and wait 500ms in between - this results in a 1Hz blink frequency.
What does the implementation look like?
 1#include <Arduino.h>
 2
 3void setup() {
 4    pinMode(LED_BUILTIN, OUTPUT);
 5    digitalWrite(LED_BUILTIN, LOW);
 6}
 7
 8void loop() {
 9    while (1){
10        digitalWrite(LED_BUILTIN, LOW);
11        delay(500);
12        digitalWrite(LED_BUILTIN, HIGH);
13        delay(500);
14    }
15}
Now the code only needs to be compiled and uploaded to the microcontroller. There are several ways to compile the software and upload it to the microcontroller.
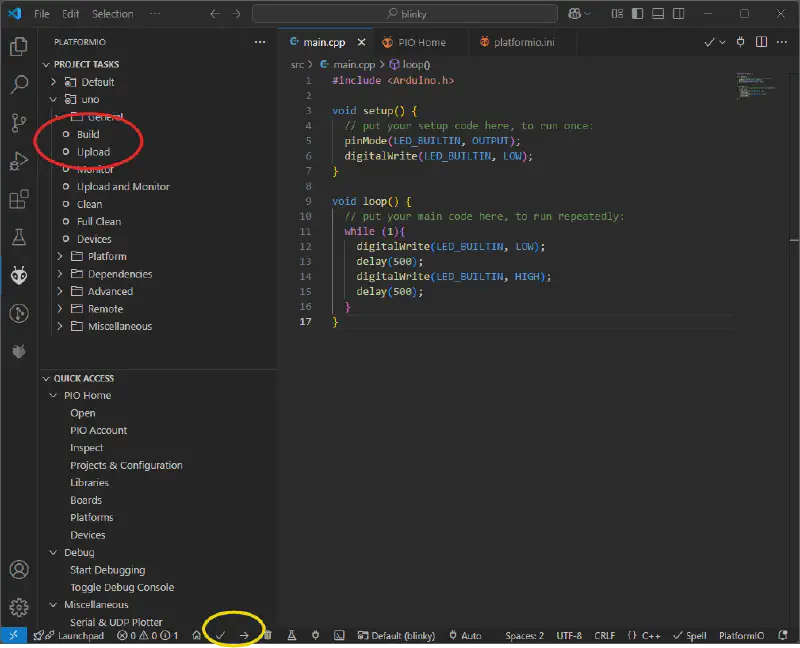
red: Compile: PlatformIO Extension - Project Tasks - uno - “Build” Upload: PlatformIO Extension - Project Tasks - uno - “Upload”
yellow: Status Bar Compile: Checkmark Upload: Right arrow
If the microcontroller cannot be found, you need to check in the Device Manager which COM port is used by the controller, which must be entered in the ini. Alternatively, you can click the plug symbol in the bar and select the correct interface and start the upload again.
Summary #

The result is pretty unspectacular, the LED blinks and blinks and blinks… it will to continue to do so until the power is cut off. If the Arduino Uno is powered again after an interruption, the program is loaded from the integrated flash memory and the last flashed program is executed: in this case “blinky”.
The code / the project is available as a download too.